You've probably found yourself squinting through a monocular, seeing something amazing, and immediately wishing you could capture that distant view with your phone. The good news is, it's often entirely possible to take photos through a monocular using your smartphone camera. It's a bit like extending the zoom capabilities of your phone without needing bulky, expensive equipment.
While the basic idea is simple, point your phone's camera at the monocular's eyepiece, achieving clear, usable photos involves understanding a few key variables. Manufacturer specifications for many modern smartphones indicate optical zoom lenses capable of up to 5x magnification, but when paired with a monocular, you can achieve significantly more. Getting that perfect alignment, however, can be the trickiest part.
Quick Answer: Yes, With the Right Setup!
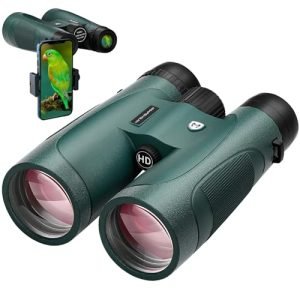
Yes, you can take photos through a monocular with your phone. Success hinges on proper lens alignment. Using a dedicated phone adapter drastically improves results.
This setup allows for capturing distant subjects with your smartphone.
How It Works: Smartphone Camera Meets Monocular Optics
At its core, taking photos through a monocular with your phone is a form of digiscoping. You're essentially using your smartphone's camera to capture the magnified image that the monocular is already projecting. The monocular itself acts as a powerful telephoto lens, bringing distant subjects closer.
Your phone then acts as the sensor, recording this magnified view.
This process relies heavily on precise optical alignment. You need to ensure that the camera lens of your smartphone is perfectly centered with the eyepiece of the monocular. If they aren't aligned, you'll often see a dark, vignetted image where the edges are heavily obscured, or the entire image might be blurry and out of focus.
Matching Your Phone's Lens to the Monocular Eyepiece
The key to success here is to match the physical position of your phone's camera lens to the exit pupil of the monocular's eyepiece. Think of the eyepiece as a small window; your phone's camera lens needs to be positioned directly in front of that window to capture the light coming through it. This requires steadiness and precision.
The Challenge of Perfect Alignment
The biggest hurdle you'll face is achieving and maintaining this perfect alignment. Hand-holding your phone to the monocular is notoriously difficult. Even the slightest tremor can throw off the alignment, resulting in a poor-quality photo.
This is why specialized accessories are so popular for this type of photography.
Your Two Main Options for Phone-to-Monocular Photography
When you want to capture images using a monocular and your phone, you generally have two primary approaches. Each offers a different balance of effort, cost, and potential success. Understanding these options will help you decide which path is best for you.
Option 1: The DIY Hand-Holding Method (and why it's tricky)
This is the most basic, and often the most frustrating, way to attempt phone-monocular photography. It involves simply holding your smartphone up to the monocular's eyepiece and trying to get the camera lens positioned directly in front of it. There are no clamps, no adapters, just your hands and your gear.
- Pros:
- It costs absolutely nothing upfront; you can try it right now with the equipment you already have.
- It's a good way to experiment and see if you enjoy the concept before investing in any extra accessories.
- Cons:
- It's incredibly difficult to hold steady enough for a clear shot.
- Achieving consistent alignment is a major challenge, leading to a lot of failed attempts.
- You'll likely experience significant vignetting (dark edges) or a completely unusable, blurry image.
- Most users find this method leads to frustration very quickly.
Option 2: Using a Dedicated Phone Adapter (Game Changer!)
This approach involves using a specific accessory designed to hold your smartphone securely and align its camera lens with the monocular's eyepiece. These adapters typically clamp onto the monocular's eyepiece and feature a bracket or arm that holds your phone. They are engineered to help you achieve that critical lens-to-eyepiece alignment more reliably.
- Pros:
- Significantly easier to align your phone camera.
- Provides much greater stability, reducing camera shake.
- Results in a much higher success rate for usable photos.
- Often allows for fine-tuning of the alignment for optimal image quality.
- Cons:
- Requires an additional purchase, though many adapters are quite affordable.
- You need to ensure the adapter is compatible with both your monocular and your phone.
Essential Gear for Better Phone Monocular Photos
To get the best results when taking photos through a monocular with your phone, you’ll need more than just the two items. While you can try to wing it with just your monocular and smartphone, investing in a couple of key pieces of gear makes the whole process dramatically easier and more successful. Think of it as equipping yourself for a specific task to ensure you can perform it well.
What to Look For in a Phone Adapter
When you decide to go with an adapter, a few features will make your life much easier. Not all adapters are created equal, and choosing the right one can be the difference between great photos and constant frustration.
- Adjustability: Look for adapters with adjustable arms or rotation mechanisms. This allows you to fine-tune the horizontal and vertical position of your phone's camera lens relative to the monocular's eyepiece. This is crucial for centering the image.
- Secure Clamping: The adapter needs to hold both your monocular eyepiece and your phone firmly. A good adapter will have rubberized grips or padding to prevent scratching and ensure a non-slip hold. It should feel robust, not flimsy.
- Universal Compatibility: Many adapters are designed to fit a wide range of smartphones and monocular eyepiece diameters. Check the product specifications to ensure it will work with your specific phone and monocular. You don't want to buy something that doesn't fit.
- Ease of Use: A good adapter should be relatively quick and easy to attach and detach. You don't want to spend more time wrestling with the adapter than actually taking photos.
- Material and Durability: While often made of plastic or aluminum alloys, a well-constructed adapter will feel solid and durable, able to withstand regular use in outdoor conditions.
Step-by-Step: Getting Your Shot
Once you have your monocular and smartphone ready, and ideally a phone adapter, it's time to put it all together. This process is a workflow designed to get you from setup to a successful photo with minimal fuss. Each step builds on the last, ensuring everything is in place before you even press the shutter button.
Step 1: Focus Your Monocular on the Subject
This is probably the most critical preparatory step. Before you even think about aligning your phone, make absolutely sure your subject is perfectly in focus through the monocular itself. Look through the monocular eyepiece and adjust the focus wheel until your subject is as sharp and clear as possible.
If the image isn't sharp in the monocular, it won't be sharp in your phone's photo.
Step 2: Secure Your Phone in the Adapter
If you're using a phone adapter, now is the time to attach your smartphone. Most adapters have a spring-loaded clamp or a screw mechanism to hold your phone securely. Gently open the clamp wide enough to fit your phone, place your phone in the bracket, and then secure it firmly.
Ensure it's centered in the adapter's holding area and won't slip out.
Step 3: Align Your Phone Camera with the Eyepiece
This is where the adapter truly shines. Attach the adapter (with your phone attached) to the monocular's eyepiece. You'll then need to position your phone so that its camera lens is directly in front of and aligned with the center of the monocular's eyepiece.
Many adapters have adjustable arms or rings that let you shift the phone slightly left, right, up, or down. Look through your phone's camera app screen. You should start to see a bright circle of light, which is the monocular's magnified image.
Adjust the phone's position until this circle fills the screen as much as possible, with minimal dark edges.
Step 4: Compose and Capture Your Image
With the alignment as good as you can get it, and your subject still in focus through the monocular, take a moment to compose your shot. Look at your phone's screen to frame the subject. If your phone has a touch-to-focus feature, tap on your subject on the screen to help the camera focus accurately.
Once you're ready, use your phone's shutter button. To minimize any shake, consider using your phone's self-timer (a 2 or 3-second delay is usually sufficient) or a remote shutter release if you have one. Press the button and hold steady until the photo is taken.
Common Mistakes to Avoid When Digiscoping
Getting started with phone-monocular photography can feel straightforward, but a few common missteps can lead to disappointing results. Recognizing these pitfalls beforehand is key to a smoother learning curve and better photos. Often, these mistakes stem from trying to rush the process or not fully understanding the optical principles at play.
Shaky Hands and Blurry Shots
This is perhaps the most frequent issue. When you're trying to hold your phone perfectly steady against a monocular eyepiece, even the slightest hand tremor is amplified. This movement during the exposure causes blur, making your image look soft or completely out of focus.
The solution often involves increasing stability, which we'll cover more in the "Expert Tips" section.
Not Focusing the Monocular First
If you jump straight to aligning your phone without first ensuring the monocular itself is focused on the subject, your photos will be out of focus. The phone camera will simply record whatever image the monocular is presenting, sharp or not. Always achieve critical focus with the monocular first.
Over-Reliance on Digital Zoom
Many smartphones have both optical and digital zoom. While optical zoom uses the camera's physical lenses to magnify, digital zoom simply crops and enlarges the image, which degrades quality. When digiscoping, the monocular is already providing significant magnification.
Adding too much digital zoom on top can result in a pixilated, low-resolution final image.
Frustration with Poor Alignment
This mistake is closely tied to the hand-holding method. Users often get discouraged when they only see a partial image or a dark circle on their phone screen. This happens because the phone camera lens isn't perfectly centered with the monocular's eyepiece.
A dedicated phone adapter is almost always necessary to overcome this challenge consistently.
Expert Tips for Sharper Monocular Photos with Your Phone
Achieving sharp, clear images when combining your phone and monocular comes down to a few key techniques. These are practices that seasoned users and optical experts recommend to maximize image quality and minimize common frustrations. They focus on stability, precision, and understanding your equipment.
Stabilize Your Setup
The biggest enemy of sharp photos is shake. If you're hand-holding the monocular and phone, try bracing yourself against a stable object like a tree, a wall, or a fence. For much better results, consider using a tripod with a mount for your monocular.
This provides a rock-solid platform, virtually eliminating camera shake. Many monoculars have a standard 1/4-20 tripod socket on their side for this purpose.
Mastering Fine Adjustments
Once you have your phone adapter roughly in place, fine-tune the alignment slowly. Look at your phone's screen and make tiny movements. You're aiming for the brightest, most complete circle of light.
If your adapter allows for both horizontal and vertical adjustments, use them. Some adapters even have focus wheels specifically for aligning the phone's camera with the eyepiece.
Lighting and Your Subject
Good lighting is crucial for any photography. When using a monocular, especially in lower light conditions, your phone's camera will have to work harder. If possible, try to photograph subjects in good natural light.
Overcast days can provide soft, even light, which is often better than harsh direct sunlight that can cause glare and deep shadows. For very low light situations, such as best binoculars for low light duck hunting, you might find that even with a monocular, your phone struggles without a tripod and a very steady hand.
Who Is This Set Up For?
This method of taking photos isn't necessarily for professional wildlife photographers needing museum-quality prints, but it's fantastic for a wide range of enthusiasts. It opens up possibilities for people who already own a monocular and want to do more with it.
Casual Nature Lovers
If you enjoy walking in nature, going on best binoculars for nature walks, or observing wildlife from a distance, this setup lets you easily share those moments. You can capture interesting birds, distant animals, or unique landscapes without needing to invest in a specialized camera system. It’s about enhancing your existing gear for better documentation and sharing.
Budget-Conscious Photographers
For those looking to get into photography of distant subjects without the high cost of professional telephoto lenses, this is an accessible entry point. You leverage the magnification of your monocular and the camera you already carry in your pocket. It’s a smart way to experiment with telephoto effects and see if it’s a passion you want to pursue further.
For instance, if you're looking for best binoculars under 300 and then want to experiment with phone photography, this approach is ideal.
When to Stick with Just Your Phone (or a Different Tool)
While taking photos through a monocular with your phone is a neat trick, it's not always the best solution for every situation. There are times when relying solely on your phone's native camera capabilities, or opting for a different piece of equipment, will yield superior results. Understanding these limitations helps manage expectations.
If your primary goal is to capture fast-moving subjects at a distance, like birds in flight or sporting events, a dedicated camera with a powerful zoom lens will offer much better autofocus and tracking. Similarly, if you need exceptionally high-resolution images for large prints or professional use, the quality limitations of a phone camera combined with a monocular will likely be insufficient. For general wildlife viewing without the need to document, a good pair of best binoculars for birding without the phone attachment is often simpler and offers a wider field of view.
For scenarios where extreme low light is critical, like best binoculars for hunting in poor light, the phone's sensor might struggle to capture detail even through a good monocular. In such cases, specialized low-light optics or cameras designed for those specific conditions would be more appropriate. The phone-monocular combo excels at moderate distances and good lighting for casual sharing, not demanding professional applications.
Final Verdict: Is It Worth Trying?
So, to wrap things up, can you take photos through a monocular with your phone? Absolutely, yes! It’s a practical and often rewarding way to extend your phone's photographic reach.
While the hand-holding method can be done, it's rarely successful for anything beyond basic experimentation.
The real key to getting usable images lies in investing in a good phone adapter. This accessory is relatively inexpensive but makes a monumental difference in achieving stable, aligned shots. With the right adapter and a bit of patience for alignment, you can capture surprisingly good photos of distant subjects.
It's an excellent option for hobbyists and nature enthusiasts looking to document their observations without a huge financial commitment. For casual sharing on social media or personal keepsakes, this setup is more than capable.
Who Is This Set Up For?
This method of taking photos isn't necessarily for professional wildlife photographers needing museum-quality prints, but it's fantastic for a wide range of enthusiasts. It opens up possibilities for people who already own a monocular and want to do more with it.
Casual Nature Lovers
If you enjoy walking in nature, going on best binoculars for nature walks, or observing wildlife from a distance, this setup lets you easily share those moments. You can capture interesting birds, distant animals, or unique landscapes without needing to invest in a specialized camera system. It’s about enhancing your existing gear for better documentation and sharing.
Budget-Conscious Photographers
For those looking to get into photography of distant subjects without the high cost of professional telephoto lenses, this is an accessible entry point. You leverage the magnification of your monocular and the camera you already carry in your pocket. It’s a smart way to experiment with telephoto effects and see if it’s a passion you want to pursue further.
For instance, if you're looking for best binoculars under 300 and then want to experiment with phone photography, this approach is ideal.
When to Stick with Just Your Phone (or a Different Tool)
While taking photos through a monocular with your phone is a neat trick, it's not always the best solution for every situation. There are times when relying solely on your phone's native camera capabilities, or opting for a different piece of equipment, will yield superior results. Understanding these limitations helps manage expectations.
If your primary goal is to capture fast-moving subjects at a distance, like birds in flight or sporting events, a dedicated camera with a powerful zoom lens will offer much better autofocus and tracking. Similarly, if you need exceptionally high-resolution images for large prints or professional use, the quality limitations of a phone camera combined with a monocular will likely be insufficient. For general wildlife viewing without the need to document, a good pair of best binoculars for birding without the phone attachment is often simpler and offers a wider field of view.
For scenarios where extreme low light is critical, like best binoculars for hunting in poor light, the phone's sensor might struggle to capture detail even through a good monocular. In such cases, specialized low-light optics or cameras designed for those specific conditions would be more appropriate. The phone-monocular combo excels at moderate distances and good lighting for casual sharing, not demanding professional applications.
Frequently Asked Questions
How long does it take to set up?
Setup time varies, but with a dedicated phone adapter, you can often go from unboxing to ready-to-shoot in under five minutes once you're familiar with the process.
Can I use any monocular?
Generally, yes, but monoculars with larger objective lenses or better optical quality will produce brighter, clearer images. Very small, compact monoculars might be more difficult to align effectively.
Will this work with all smartphones?
Most modern smartphones with good camera systems will work. Compatibility is more about the physical size of your phone and its camera lens placement fitting the adapter.
What is the maximum zoom I can achieve?
The maximum zoom is limited by your monocular's magnification. A 10x monocular will give you 10x magnification, and your phone will then capture that image. Adding digital zoom on your phone can increase this further, but usually at the cost of image quality.
Is it better than just using my phone's digital zoom?
Yes, for distant subjects, it's typically much better. The monocular provides optical magnification, which is inherently higher quality than digital zoom alone. This allows you to get closer without losing as much detail.